Paris Eiffel fabric swatch make photo frame brooch
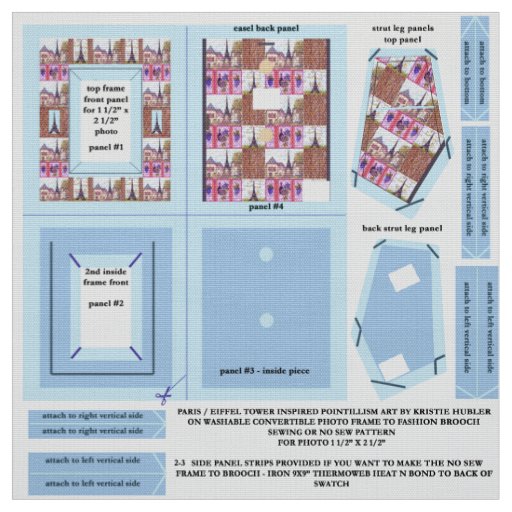
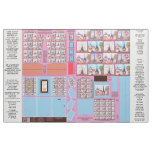
A PARIS / EIFFEL TOWER INSPIRED, WASHABLE, FABRIC, FASHION BROOCH PIN, CONVERTIBLE TO A WASHABLE, FABRIC, TABLETOP PICTURE FRAME FOR A 1 1/2" x 2 1/2" PHOTO This swatch of fabric, 9x9", has Kristie Hubler's Paris / Eiffel Tower inspired art, as a cut and sew, a sewing pattern with art formatted for each panel part, in this case, to make a washable, fabric photo frame for a 1 1/2" x 2 1/2" photo (those tiny photos that you get with kids school pictures, and they like exchanging with their friends), and the frame, when you take off the removable strut leg, with hook & loop / velcro and ribbon hot glued onto the strut leg, is convertible to a fashion brooch, just insert a metal 1 3/4" bar pin back, that slides in and out of its pocket. The art, created by Kristie Hubler, was inspired by photos of Paris, France, the Eiffel Tower, and walking through Paris Las Vegas resort and casino, admiring the indoor shop facades. The fabric swatch pattern is backed with Thermoweb Heat n Bond, that is paper backed, and is an iron on fabric adhesive, fusible web, that bonds to the back of the fabric swatch, and gives structure to the frame brooch panel pattern parts. It helps keep all of your right angles nice and 90 degrees, crisp, and keeps the fabric from puckering. Ultrahold is acid free, Heat n Bond Lite is not. You'll cut an acid free sheet protector page (found in packs of 50 or 100 sheet pages at Walmart, Walgreens, Target - make sure you get a pack that is labeled "acid free". You cut the sheet to the size of the photo, using the folded side of the sheet protector to make a 2 sided "folder" or protective photo sleeve. These, plus a roll of thread that coordinates with the light aqua blue, or light blue in the pattern, a 6" long by 3/8"-1" wide color coordinating ribbon, and 3/4" wide by 1 yard white velcro (can be found for $1 in JoAnn Fabrics)- this you may need to cut down to fit within the white squares ON the fabric, indicating where to hot glue (or sew if you wish) the velcro / hook & loop. You can hot glue the rough part of the velcro to the ribbon parts and the strut leg. You buy a 1/4 yard of Thermoweb Heat n Bond, Ultrahold or Lite, sold in JoAnn Fabric by the 1/4 yard incriments for as little as $0.25-$0.50, or if you make the whole yard of fabric, or even a fat quarter, by Heat n Bond by the 17" wide by 5 yard roll for as little as $4.49 at Michaels using their 50% off store coupon - can also buy by the roll at AC Moore. The Heat n Bond gets cut to 9x9",then measure across the width from the left side edge to the edge of the right side of the main frame panel's light blue seam allowance outer edge, the easel back panel with art on it, that should be about 6 5/8" across x 9" long, and iron that piece of 6 5/8" wide by 9" long Thermoweb to cover the back of the swatch, covering the 4 frame, rectangle panel part patterns, and the 2 sets of strips below (the strips will be ironed to the vertical strips on the right, ironed together, to make a "ledge" on 3 sides of the frame brooch, for the photo and sleeve pocket. Then from the right edge of the remaining Thermoweb that you cut from, cut about 7/8"-1" in by the 9" long, enough to be ironed to the back of the right side, lengthwise, covering the 3 sets of strips on the right of the fabric. When joined, ironed together,the double sided fabric strips, double edged, will make "V's", "ledges, on 3 sides to hold the photo and it's protective sleeve from sliding about. Here is where it's tricky. To cut the Thermoweb to cover the back of the strut leg panels on the fabric, take a sheet protector, lay it OVER the fabric, and use a Sharpie marker, and outline the OUTER edge of the light aqua blue seam allowance edges for both strut leg panel pattern parts on the fabric. Clean up your lines best you can, and place a sheet of printer paper over the the sheet protector page that you transferred lines to, and go over those lines with a pen. Clean up your lines, use a ruler if you have to, and cut those 2 strut leg patterns out. Then, place those 2 strut leg paper patterns onto the paper back side of the remaining strip of Thermoweb, and trace around the 2 strut leg patterns, cleaning those lines up afterwards, of course. Now, ON the 2 strut leg Thermoweb paper side patterns, you are going to cut out a 1/4" strip of Thermoweb, and then you will have a 2 part strut leg Thermoweb pattern for BOTH strut leg fabric panels. How you do this, is measure how far down from the light aqua blue outer edge of the seam allowance is, down to the light aqua blue line ON the strut leg panel fabric, and make a line 1/8" above that, and below that line, AND THAT is where you cut away your removable strip- by removing this 1/4" strip, around the area of the light aqua blue line is, by not having the Thermoweb here, will help the joined 2 strut leg panels, becoming the finished strut leg pocket panel, BEND where that light aqua blue line is. You will have Thermoweb on the side light aqua blue seam allowances vertically next to the "bend line", but having no Thermoweb around that bend line allows the strut leg to bend out - the ribbon, with velcro attached, helps stop the strut leg from pitching out too much. Iron the 2 part Thermoweb panels to both strut leg fabric panel backs. Use straight pins, pushed through from the front, to guide you where to place and iron your Thermoweb panel patterns on the back. Remember that, when you will place the Thermoweb panel patterns on the opposite strut leg fabric panel, BECAUSE, you traced the front fabric panel, and you are adhering the Thermoweb panels to the BACK of the fabric panels, so just switch the Thermoweb panel patterns to the other fabric panel lol. Just iron the Thermoweb to the back, cut and ironed as typed above. Cut out around the outer edges of all light aqua blue "seam allowances", then cut all of the: 4 corners on each of the 4 rectangle frame panel patterns all 5 corners on both strut leg panel patterns and along the light aqua blue line of the strips cut away these corners as close to 45 degrees as possibly, on the strut leg panels, follow the darker teal cut lines as a guide to cut corners away fold back and under your light aqua blue seam allowance flaps, pressing the Thermoweb sides together, use your fingernail to burnish along the fold edge lines - this helps them stick together. On the 2 frame front panels, after you cut and fold the outside seam allowances down, do the same for the inside flaps, cutting along lines that go into the inner corners, at as close to 45 degrees as possible, and fold those seam allowance flaps under and back. You can use hot glue to "seal" the inside corners points, dab the tip of the glue gun on the corner point, from the front, and from the back, bring your index finger or thumb tip from behind, up, and pull back the glue to the back, blowing as you do this. If you want to use a plastic wrapped toothpick to do this, you can, or something that hot glue won't stick to. Place the Paris / Eiffel art front frame panel on top of the 2nd inside frame front panel, which is light blue, with that teal line on it, to form a U shaped line. Sew these 2 panels together along the INSIDE edge, the area where the photo will show through, about 1/16" from the inside fold edge. Put that aside. Hole punch or cut out the 2 holes on the 2 easel back panels, one with the art on it, the other light blue, with a pair of pointy, tiny, embroidery scissors. The Thermoweb on the back "seals" the holes' edges. Cut the white velcro to fit within the white areas on the art printed easel back, and hot glue or sew them on, straight stitch, then use zigzag stitch, 0-1 stitch length, 3-4 stitch width on your machine. Take the joined 2 frame fronts, design facing up, and place over the light blue, inside easel back panel with light blue holes cut out, pin in place on 2 vertical and bottom sides, and sew along the teal line, pushing back the top art printed frame front panel, so as to not sew that to the light blue easel back panel, and fold the right side, then the bottom, and then the left art printed side, away from the needle, as you go. This makes the pocket for the photo and it's protective sheet protector sleeve. Then ONLY sew the top edge of the 2 frame fronts together, pushing the light blue easel back panel away from where the needle could catch it. Now, turn the 3 frame panels, joined, over to the glue side of the finished light blue easel back panel, and place the finished art printed easel back on top, holes cut out, and velcro glued or sewn on. ONLY sew the top of BOTH easel back panels together. Then, you will sew the REMAINING 3 sides, right, bottom, and left sides of the OUTER edges of the 2 easel back panels, together. Put that aside. Finish your strut leg pocket panels, cutting the velcro to size to fit within the white areas, hot gluing or sewing them on, like the other velcro pieces. Then sew the 2 strut leg panels together. Take the remaining pieces of velcro, making sure they are the OPPOSITE of the the other sister velcro piece of it, take your ribbon length, roll over one tip twice, hot glue closed, then hot glue the velcro onto that double folded ribbon tip. At this point the other end of the ribbon is raw, just a cut edge. Stick your velcro'd strut leg panels to the easel back panel, so it can stand upright. This is where you play with the length, and how much to cut and double fold your ribbon tip with velcro. Pitch out the strut leg so it can stand, with the raw cut end of ribbon UNDER the bottom of the frame, and when it stands, that's where your velcro will start on the ribbon, so pin their, cut 3/4" past the pin on the ribbon, double fold the ribbon, seal with hot glue, and hot glue the velcro on the double rolled ribbon tip. Finished! Just remove strut leg, and slide in a pin back to convert the brooch frame.


