Fabric: Combed Cotton (56" width)
Our Combed Cotton is a lightweight cloth that is easy to work with. This versatile fabric is perfect for sewing projects including quilting and appliqué.
- Content: 100% cotton
- Thread count: 210 inches (82cm)
- Width: 56”
- Stretch: None
- Weight: 3.82 oz per square yard
- Shrinkage: < 1%
- Suitable for: Quilting, appliqué, and crafts
- Care Instructions: Machine Wash Separately, Cold Water, Gentle Cycle, No Bleach, Tumble Dry Low Heat, Cool Iron
- Print Technique: A direct print process that uses colorfast, pigment inks. Our state-of-the-art finishing process produces beautiful fabric prints with great clarity and a soft finish that will not fade over time or in the wash.
Size: Yard
Inspiration is at the heart of every DIY project. Whether you are creating a beautiful quilt, refreshing your home décor, or making crafts, our custom fabrics are uniquely designed to inspire you. Our high quality fabrics are fully customizable and printed on demand with eco-friendly inks, creating fabrics that are ‘sew’ perfect for any project.
- Select from 7 fabric types; learn more about each fabric type here
- Available as swatches, fat quarters, or by the yard
- Fabric widths vary by fabric type. See details of each fabric type below
- Fabrics by the yard print on 10 continuous yards
- All Zazzle fabrics are Consumer Product Safety Improvement Act (CPSIA) compliant
- Eco-friendly fabrics, printed with water-based inks. Contain no added chemicals or toxins
- Not suitable for children’s sleepwear or crib use
- Amount of selvage on each piece of fabric will vary
- Printed in U.S.A.
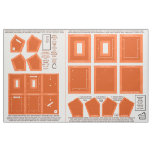
Zazzle Fabric Washable No Sew Black Photo Frames
fabric
cut and sew patterns
make 2 photo frames
This fabric, combed cotton, 56" wide by 36" yardage, has patterns, panels formatted, to make WASHABLE, NO SEW, photo frames, black photo frames, 2 frames, each for 5x7" photos, one is 8x10" overall, and the other will measure 6 3/4" x 8 3/4" overall. Each frame pattern has 10 panel parts. All panel parts have seam allowances to fold under, skinny lines to cut away excess fabric, or to cut into corners, to guide you, to make the most perfect handmade fabric photo frame, without sewing. 3 panels, which will be inside the frame, have holes, strategically marked on each panel, to thread 1/8" wide skinny ribbon through them, that connects the 3 panels, making the pocket for the photo and it's clear, acid free, sleeve - a sheet protector page cut to the size of the photo! Yep, the kind you find in an office supply store, like Staples, or even Target, Walgreens, or Walmart - a pack of 50 can be bought for under $5. Supplies needed: a 5 yard roll of 17" wide Thermoweb Heat n Bond Ultrahold or Lite, found inexpensively at Michael's for $8.99, but when you use a store coupon, you can get it for as low as $4.49! You need the Heat n Bond, as it gives structure to the fabric panels, keeps the structure of the frame, allows for the frame to stand on a table or shelf - and it is easy to use! Just iron the paper backed, fabric adhesive to the back of the fabric -you can push straight pins on the outer corners of the seam allowances of the fabric panel parts, and iron each Heat n Bond piece centered on the back side. Ultrahold is acid free, which is a plus for photos, when combined with the pigment based ink on the natural cotton or linen fabric. Add the clear, acid free sheet protector, plus cut up mat board for the slide out easel back and strut leg boards (pattern for strut leg boards are ON the fabric) - and you have a mostly acid free photo frame, or at least substantially more than the average fabric photo frame. ribbon: 10 feet at least of 1/8" wide ribbon - finally, a use for that skinny ribbon! This is good for both frames 2 lengths of 1 1/2" wide ribbon, each at least 9" long mat board or cardboard: 20x30" mat board for $5 at Michaels, or $8 at AC Moore for 32x40" - you just need 2 pieces, 7x9" & 6x8" for the 2 easel back boards, and enough to make the strut leg boards, patterns ON the fabric, so 14" x 18" should do the trick, for all of the boards Tools: hot glue sticks - 10 to 15 with a low temp hot glue gun embroidery scissors - pointy, small fabric scissors, found at JoAnn Fabric, joann.com, Michaels, for under $10 -don't forget to use a store coupon fabric scissors ruler, pencil or pen for cutting Thermoweb iron paper scissors utility knife or paper scissors to cut mat board or cardboard Video tutorial will be on http://youtube.com/user/fabricatedframesCom Step by step, photo and text tutorial will be on http://fabricatedframes.blogspot.com You have 10 pattern panels formatted to size, with all of the markings on the panels to help you: 2 FFB - frame front border, 2: front FFB (front of frame), backed by the 2nd Inside FFB behind it The 2nd inside FFB, along with the 2 FM, or frame middle panels, have 7 holes to cut out on each - these 3 panels, when connected with 1/8" ribbon thread through the holes to connect the panels, makes the photo pocket for the photo, and the protective photo sleeve, which is a clear, acid free, sheet protector page, cut to the size of the photo the outer 3 edges of the FM panel gets got glued to the 2 EB, or easel back panels, making the pocket for the easel back board. The top of the strut leg pocket gets hot glued to the easel back the strut leg panels, have 2 lines, indicating where it bends - just make sure that NO Thermoweb is ironed to that section between the lines on the strut leg panel - that area needs to be free to bend. There is a trick to making them with that area sans Thermoweb, just watch my video on Youtube, and follow my blog tutorial, and let me show you how. Basically you will take a sheet protector, cover the top of the strut leg panels, and draw over the outer seam allowance edge, and the main strut leg area inside, then transfer those lines onto the Thermoweb- just make a pattern for the front panel marked, and one that goes in the opposite direction of the front strut leg panel. You will see that 2 strut leg panels go one way, and the other 2 go the other way. See the fabric, and watch the video and blog tutorial. sheet protector - up to 12 pages, so buy a 50 sheet pack - they help to make patterns, and you can keep them for other frames making patterns. Make sure to buy acid free, just check the label, if not labeled acid free, it is not acid free. This frame, the no sew, washable, fabric photo frame, was invented by me, Kristie Hubler, for crafters who wanted a more durable, versatile fabric photo frame, and fabric picture frames should be washable! More colors will be offered soon, as well as 4 other sizes, to make washable, no sew, fabric picture frames, for photos sized: 8x10", 2 for 5x7", 4x6", wallet sized 2 1/2" x 3 1/2", and 1 1/2" x 2 1/2" allow 2-3 hours, as little as 1 1/2 hours to wash: take out the photo and sleeve, the 2 boards, and place fabric photo frame in a lingerie bag, wash in the cold, delicate cycle with mild detergent. Air dry on towel. Can be put on "air dry" in the dryer, or dry with a hair dryer on cold or low. THANK YOU! Inventor, Kristie Hubler, owner of http://fabricatedframes.com sewing pattern download crafts & printables with my art formatted for panel parts to make my washable, sewn, fabric photo frames & brooch pins, plus house shaped pot holders
Thank you!
Kristie Hubler, artist, inventor of washable photo frame & brooch
http://fabricatedframes.com
https://zazzle.com/store/fabricatedframes/products
fabricatedframescom@gmail.com
Zazzle Fabric Washable No Sew Black Photo Frames
"Comp. value" prices are based on the prices of comparable items offered for sale elsewhere in the market.
These comparisons consider a number of factors, including product materials and features, fulfillment time, available customization options, product quality, and importantly royalties, which are set by independent creators and may result in price increases for seemingly-similar products.
Because the designs sold on Zazzle are each unique, we encourage you to conduct your own comparison shopping to appreciate the great quality and value we offer. Learn More
Customize It!
Edit this design template
Options
|
Save on
|
|
|
Only more on
|


